top of page
Search

Updated: Nov 13, 2020


,

Have you ever wondered how an English watchmaker could have made so many watches (based on serial numbers), or why so many movements look almost identical?. In this blog, I will try to answer these questions.


To manufacture a watch movement, a number of different trades/skills were required, all differing and all needing expertise in the given field. Large machinery was required to produce some parts and this required power, either man powered, water driven, or later steam and then electric.

A modest to medium sized watchmaking business wouldn't have the necessary man power to give such a diversity of skills or premises large enough to house machinery and raw materials, so they bought in parts from factories that had the machinery, skills and raw materials on hand. Each manufacturer would specialise in a particular area and may be at different ends of the country.

Can you imagine, with no internet or telephones, the difficulty in managing a dozen suppliers by post or having to make long and slow regular trips?

The parts that they bought in, would have been in the rawest of states barley resembling a finished watch.

In the mid 19th century manufacturers began to merge their factories and skills, emulating the Swiss ebauche (french for blank) makers. Some of the large English watchmakers brought everything in house, for example J.W. Benson and the Lancashire Watch Company who even made their own cases.

This is the only way the English watchmaking industry (who had been more focused on the art and science of timekeeping), could attempt to keep up with the emerging mass producing American watchmakers and Switzerland who had been perfecting mass production of the ebauche since the 17thc.

The watchmaker could now buy in an almost finished watch, with most of the parts he needed, making it logistically much simpler and less time consuming than purchasing from a multitude of manufacturers.


What was in the kit?

1. Dust cover. 9. 3rd wheel.

2. Bottom plate. 10. 4th wheel.

3. Top plate. 11. Escape wheel staff/pinion.

4. Spring barrel bridge. 12. Spring set up components.

5. 3rd wheel bridge. 13. Fusee power maintaining and stop works parts.

6. Spring barrel 14. Balance cock with regulator and jeweling.

7. Fusee.. 15. Screws.

8. Centre wheel. 16. Dial


What did the watchmaker have left to do?


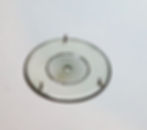
1. The dust cover would need gilding and the retaining steel spring blued.

2. The bottom plate would be gilded then would have the pivot holes opened to size or jewelled, winding arbour and spring barrel arbour holes opened to the watchmakers specification, balusters drilled to take fixing pins.

3. The top plate like the bottom plate would be gilded, its pivot holes would be sized or jewelled, increments on the regulator and fast/slow indicators would be engraved, the watchmaker may choose to engrave his name also.

4. The spring barrel bridge was gilded and may have some engraving, the spring barrel arbour hole opened as required.

5. The 3rd wheel bridge was gilded and pivot holes opened as required or jewelled.

6. The spring barrel arbour was turned to the required size corresponding with the bridge and bottom plate. The barrel was gilded.

7. The fusee complete with clicks ratchet power maintaining spring and wheel was grooved with a spiral for a chosen chain size. Arbor was turned to the required size for top and bottom plates.

8. The centre wheel staff turned to the correct length with pivots and required end shake.

9. As with number 8.

10. As with number 8.

11. The watchmaker would take from his preferred escarpment stock an escape wheel, matched to a lever and turn the staff to the required length.

12. the spring setup ratchet and click would be blued.

13. The fusee stop and spring blued.

14. The balance cock would be engraved if required and gilded.

15. Screws were polished and blued.

16. The dial feet drilled to take fixing pins.

As with the escapement the maker would chose his preferred balance, balance spring and main spring all calibrated to work in harmony.


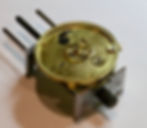
A finished movement from a similar ebauche.


Written by David Panunzio @romandial.com

February 2018

418 views0 comments

We regularly get asked by our customers what is involved in the restoration process. We have therefore put together a short description illustrated with pictures of the renovation stages.


1. Before Restoration.

Here we have a chronograph pocket watch from 1886 with an 11 jewel 3/4 plate movement ready to be restored to its former stylish simplicity.


2. Removal of Movement.

To begin with, the hands are removed from the watch and the movement is removed from the case. We won't reuse the hands in this case as the design of the hour and the minute hand are not matching and the second hand is a little short.


3. Service Begins.

We remove the balance first as it is delicate and can be easily damaged.


Once the balance is removed it's cleaned with a solution to clean away dirt grease and oil. This is a specific solution for balances that doesn't dissolve shellac.


Dial has been removed and put to one side for cleaning later. lso you will notice the dial centre had been taped on. It is common for dial adhesives to break down over time but taping it is not a good solution as the tape can interfere with the motion works and also it will peel away.


Motion works are removed and mainspring let down. Parts go into a basket ready for cleaning.


The escapement is removed and placed in the basket. Top plate is removed, the fusee cone is dismantled, spring removed from the barrel and all the parts are put in a cleaning solution and then rinsed.


The parts are left to dry.


Once dry, the reassembly begins.


Top plate is back on..


Fusee chain reattached and escapement back in place.


Balance back in, the stop lever is checked for correct depthing.

.

4. Dial Repair.

Dial is cleaned and traces of tape and adhesive are removed.


All clean, the inner dial and outer dial are lined up.


Adhesive added to the channel.


While the adhesive dries, the motion works are put back in place.


5. Testing & Regulating.

The watch is now ready for testing. It will be run for about a week, regulating it daily

until it is within 1-2 minutes of error per 24h. We always test pendent up as this is the most likely position the watch will be used.


6. Metal Work.

Now the regulating and testing have been completed the case requires attention. Dents and deep scratches are removed then the case is machine polished followed by final hand polishing.


A new glass is fitted.


7. The Finished Product.

The movement is returned to the cleaned and polished case and then pinned.


Written by David Panunzio @romandial.com

November, 2017.


314 views2 comments

Over the past decade we have found that more and more watches come back to us

with the following issues:


  • Running fast

  • Running slow

  • Stopping intermittently


While this can sometimes be an issue with the watch in 90% of cases, the watch has become magnetised. We believe this is caused by the digital age mobile phones, tablets and PC's, If you are like me, you may use your iPad as a tray when moving from room to room, beware if you place a watch on your ipad as it will become magnetised, Mobile phones are equally good magnets, Put your watch on your phone or in your pocket with your phone and it will become magnetised, Laptops and PC's have also great magnets, Loudspeakers for your TV surround sound system - while these are often shielded, they still produce a field strong enough to magnetise your watch.


Below shows the effect of some of these devices on a navigation compass.


The reason magnetic fields and magnetisation of watches causes such a problem is down to the balance spring. Once it becomes magnetic even slightly, it can become distorted. The coils of the spring can stick to each other or pull against the natural movement and this has an effect on the amplitude of the balance swing causing the above symptoms.


If you are experiencing any of the above issues, you can easily check with a cheap navigation compass holding it close to the balance. You will see the needle oscillate with the balance.


Demagnetising is a quick and simple process, if you have the correct equipment. There are some cheap demagnetisers on the market, but these unfortunately are poorly constructed. They use one side of a transformer leaving the other side unconnected, to produce a field this which is not precise and needs trial and error to find the sweet spot - by this time your demagnetiser is very hot and may begin to melt as they can only be run for a few seconds at a time.

There are some very good demagnetisers out there, but be prepared to spend upwards of £200.


Written by David Panunzio @romandial.com

October, 2017.


215 views2 comments
bottom of page